Friday, November 25, 2011

[Salesforce/SugarCRM] Live data synchronization between Salesforce.com and SugarCRM

Introduction

This post will present how to set up a master/slave synchronization between two great CRM: Salesforce and SugarCRM.
I have been working at Salesforce.com as a Technical Architect the last three years, so I have a heavy practice of Salesforce but I am a SugarCRM newbie: coding in Sugar is a brand new experience. My code is probably not 100% best practices so feel free to share your advices in the post comments.
Disclaimer: the provided code samples are straight forward; they are not dedicated to run in a production environment. You might want to pick up some parts but use it at your own risks.
The code is available under the GPL license 3.0.

The scenario


The Salesforce organization is the master data. Each time an account record is created or updated, a REST call is sent to the SugarCRM instance. SugarCRM will create a new record or update an existing one, based on the Salesforce record Id.
This is a one way synchronization, the aim of this post is to keep it simple and providing clear code samples.

Salesforce side

Salesforce Developer Edition

I am working with a Salesforce Developer Edition (DE). This a free edition that brings with the same features as the Unlimited Edition. The main limitations are: 2 crm user licenses and the data storage (up to 5Mb). Sign-up for a DE.

The Apex trigger

An Apex trigger is fired each time a record is created or modified (on the after update event). This process will run when using the HCI (Salesforce in the web browser) and also with the Salesforce API (using the data loader e.g.). So we need to bulkify the code. This is a best practice that will let your trigger process 1 record (HCI) or 200 records as well (data loader, 3rd party tools using the API).
The Apex trigger will call an asynchronous method that will send the REST message to SugarCRM. As it is asynchronous, the end user is not disturbed by the synchronization process as it ran behind the scene.
The trigger code:
trigger AccountAfterUpdate on Account (after update) {
    Set AccountIds=new Set();
    for(SObject a : Trigger.New) AccountIds.Add(a.ID);
    SugarCRM.AccountUpsert(AccountIds);
}
Remark: the id double tags at the end of the code sample is a Syntax Highlighter bug.

Why REST rather than SOAP?
I highly recommend using REST rather than SOAP web services:
- it is quicker, easier, a lower maintenance (no need to import a new wsdl at each release)
- Salesforce meets some limitations when importing wsdl files. E.g, importing an external schema is not supported and provide the following error:
Error: Failed to parse wsdl: Found schema import from location http://schemas.xmlsoap.org/soap/encoding/. External schema import not supported

The Apex Class

Login method
Logs in SugarCRM using the user name and a MD5 hash of the password. The previous post is explaining how to generate the MD5 value.
AccountUpsert method
Sends the data. The method has the @future(call=true) annotation. It means that the execution is asynchronous, it does not impact the governor limits of the current transaction.
Objects cannot be passed as parameters, only primitives can: that is why I am using a set of record Ids.
The REST call is straight forward, the Json is hardcoded. If you want to improve the code and get something smooth, I recommend to built on the fly the Json syntax based on a structure declaration. Read this interesting post: http://www.tgerm.com/2011/10/winter12-jsonparser-serialize.html

The end point:
I recommend to declare the end point as a System Label. My demo is working on a virtual machine that changes its IP address and name at every reboot.
Setup | Administration Setup | Security Controls | Remote Site Settings


Apex Class code:
public class SugarCRM {

    private final static String endpointUrl = 'http://mc-178-20-142-224.ovh.net';

    @future (callout=true)
    public static void AccountUpsert(Set AccountIds) {
        String SessionId = login('admin','1e87fae4d9133d53124fedcfeca02adc');
        CallAccountUpsert(SessionId, AccountIds);
    }
    
    public static String login(String user, String password) {
        String sessionId='';
        Http h = new Http();
        HttpRequest req = new HttpRequest();
        String url=endpointUrl+'/sugar/service/v2/rest.php?';
        url=url+'method=login&input_type=json&response_type=json&rest_data={"user_auth":{"user_name":"'+
            EncodingUtil.urlEncode(user,'UTF-8')+'","password":"'+EncodingUtil.urlEncode(password,'UTF-8')+
            '","version":"0.1"},"application_name":""}';
        req.setEndpoint(url);
        req.setMethod('GET');
        // Send the request, and return a response
        HttpResponse res = h.send(req);
        String Body = res.getBody();
        //System.Debug('##Body='+Body);
        JSONParser parser = JSON.createParser(Body);
        while (parser.nextToken() != null) {
            //System.Debug('##getCurrentToken()='+parser.getCurrentToken()+',parser.getText()='+parser.getText());
            if ((parser.getCurrentToken() == JSONToken.FIELD_NAME) && (parser.getText() == 'id')) {
                parser.nextToken();
                sessionId = parser.gettext();
                break;
            }
        }
        System.Debug('##sessionId='+sessionId);
        return (sessionId);        
    }
    
    public static String CallAccountUpsert(String SessionId, Set AccountIds) {
        Http h = new Http();
        HttpRequest req = new HttpRequest();
        String url=endpointUrl+'/sugar/service/v2/rest.php?';
        String url1='method=set_entries&input_type=json&response_type=json&rest_data='+
          '{"session":"'+SessionId+'","module_name":"Accounts","name_value_lists":[';
        for(Account a : [Select Id, Name, Phone From Account Where Id IN :AccountIds]) {
            url1+='[{"name":"assigned_user_id","value":"1"},{"name":"name","value":"'+EncodingUtil.urlEncode(a.Name,'UTF-8')+'"},'+
              '{"name":"phone_office","value":"'+EncodingUtil.urlEncode(a.Phone,'UTF-8')+'"},'+
              '{"name":"salesforceid_c","value":"'+a.Id+'"}],';
        }
        url1=url1.replaceAll(',$','');
        url1+=']}';
        //url1=EncodingUtil.urlEncode(url1,'UTF-8');
        url+=url1;
        System.Debug('##url='+url);
        req.setEndpoint(url);
        req.setMethod('GET');
        // Send the request, and return a response
        HttpResponse res = h.send(req);
        String Body = res.getBody();
        System.Debug('##Body='+Body);
        return Body;
    }
}


What is an upsert?

Let 's start with the Wikipedia definition: http://en.wikipedia.org/wiki/Upsert.
<< The term "Upsert" refers to any database statement, or combination of statements, that inserts a record to a table in a database if the record does not exist or, if the record already exists, updates the existing record. The term upsert is a portmanteau of update and insert and is common slang among database developers. >>
The upsert is a common DML statement Salesforce. I did not find the equivalent in SugarCRM and coded my own Upsert behavior.

The test methods

Before deploying your code to the production environment, you must write some test methods and get a minimum code coverage of 75%. We will not write the test methods as they are not needed in a DE environment.

SugarCRM

Assumptions

You have a SugarCRM installation reachable by Salesforce. I deployed the open source version of SugarCRM: the community edition version 6.4.0 running on a virtual Ubuntu 10 64 bits hosted by OVH Cloud. I will not detail the installation walk through in this post in order to keep focus on the code.

change the data model

The Salesforce Account Id will match a foreign key called salesforce_id.
Create the foreign key
Go to Admin | Developer Tools | Studio. Click on the Accounts Icon.
 Click on the "Fields" icon, then the "Add Fields" button. Create a string field called salesforceid. The name will be salesforceid_c. Set the length to 18.
 Then click on the layouts icons. Edit the "View" page layout. Add a section that contains the new custom field. Do not add the field to the "Edit" page layout because we want only Salesforce to be able to change the value.


SugarCRM beginner Best practices

use the sugar logs to trace the execution. Go to Admin | System Settings | View Log. Set the log level to "Debug". This spot is really useful when it comes to trace all the application behavior, especially when you are dealing with hooks.
Use a MySQL Gui or command line client, I am using "emma" (for Extendable Mysql Managing Assistant) on Ubuntu, a fancy editor.

Add a Hook

A hook is a piece of code that will be triggered during an event.It may be compared as a data base trigger or a Salesforce trigger. More on SugarCRM events in the developer documentation.
As the upsert action does not exist in SugarCRM, I coded my own. This is my first hook and I had some hard time to dig the web, read the docs, parse the code, check the data base and make my own stuff. All critics are welcome.
I set the log level to "debug" to highlight the unexpected behaviors: Sugar was executing the hook several times (because I am saving a new account record inside the hook). To prevent multiple executions, I added a semaphore behavior inside the hook class: an array that contains the ID of the recorded already processed (cf private static array $canTrigger)

First of all, you must declare the event:
$SUGARHOME/custom/modules/Accounts/logic_hooks.php
// Do not store anything in this file that is not part of the array or the hook version.  This file will 
// be automatically rebuilt in the future. 
$hook_version = 1; 
$hook_array = Array(); 
// position, file, function 
$hook_array['after_save'] = Array(); 
$hook_array['after_save'][] = Array(1, 'Account From SFDC', 'custom/modules/Accounts/AccountFromSFDC-AfterUpdate.php','AccountFromSFDC', 'AccountUpsert'); 

Then, the Hook:
I am tracking when entering/exiting the class with the logs. The semaphore prevents the save method from re-executing the hook code. I do not know if this is a best practice as I was not able to find on Google a sample of code to perform an Upsert.
$SUGARHOME/custom/modules/Accounts/AccountFromSFDC-AfterUpdate.php
//AccountsTestHook.php
if(!defined('sugarEntry') || !sugarEntry) die('Not A Valid Entry Point');
class AccountFromSFDC{

 static private $canTrigger = array();

 function AccountUpsert(&$bean, $event, $arguments) {
  $GLOBALS['log']->warn("######## AccountFromSFDC-AfterUpdate.AccountFromSFDC - START");
  $GLOBALS['log']->warn("#### self::\$canTrigger=".implode(',',self::$canTrigger));
  if (array_search($bean->id,self::$canTrigger)===false) {
   $GLOBALS['log']->warn("##### continue: entering in the hook Account After Save");
   array_push(self::$canTrigger, $bean->id);
   if (empty($bean->fetched_row['id']) && ($bean->salesforceid_c!='')) { // on after insert
    $query = "select id_c from accounts_cstm where salesforceid_c='".$bean->salesforceid_c."' and id_c!='".$bean->id."' limit 1";
    $GLOBALS['log']->warn("##### query=$query");
    $res=$bean->db->query($query);
    $row=$bean->db->fetchByAssoc($res); 
    $GLOBALS['log']->warn("##### count(\$row)=".count($row).', $row[\'id_c\']='.$row['id_c']);
    if ($row['id_c'] != '') {// foreign key match
     $GLOBALS['log']->warn("##### \$bean->id=".$bean->id);
     $b = clone $bean;
     $b->id = $row['id_c'];
     array_push(self::$canTrigger, $b->id);
     $result = $bean->db->query("delete from accounts where id='".$bean->id."'");
     $result = $bean->db->query("delete from accounts_cstm where id_c='".$bean->id."'");
     $b->save();
     
     /* this process should only happen through the API as the salesforceid_c is not on the Edit page layout
      * otherwise you should redirect to the new page:
              $site = $sugar_config['site_url'];
     $GLOBALS['log']->warn("##### {$site}/index.php?module=Accounts&action=DetailView&record={$b->id}");
     $GLOBALS['log']->warn("######## AccountFromSFDC-AfterUpdate.AccountFromSFDC - END (return)");
     SugarApplication::redirect('index.php?module=Accounts&action=DetailView&record='.$b->id);
              */
    }
   }
  } 
  else {
   $GLOBALS['log']->warn("######## exit: do not enter in the hook Account After Save");
   return;
  }

 }
}

The home made upsert process:

Entering condition: new record ($bean->fetched_row['id'] is empty), but a new record had been created.
Case 1: no Salesforceid_c. Do nothing.
Case 2: the record does not match a Salesforceid_c. Do nothing.
Case 3: the record matches with a Salesforceid_c: delete the previous record in the data base, set the previous record id to the new record.

Synchronization: mapping

SalesforceSugarCRM
IdSalesforceid_c
NameName
PhonePhone_office

Now let's test!

To improve your tests, I recommend starting by executing Anonymous Apex code, and following the results using the "System Logs" or the "Debug Logs". The "Debug Logs" will trace all the code execution, including the @Future call (asynchronous call).

Salesforce: with the browser

Update 1 account
Salesforce: go to the Account tab, choose an account. Make any update you like on the account in order to fire the trigger.

Then go to Sugar, make a search filtered on the account name, woohoo, it works!

Update again the account
In Salesforce, change the Phone value and click on the save button:

In Sugar, refresh the detail page of the account:

Salesforce: bulk load

The bulk load is a common behavior when using the API: instead of pushing the records 1 by 1, we are pushing them by 200. This makes the overall process quicker as all the user validation rules, workflow, triggers, assignation, case escalation, roll up summary fields are updated during the load.
Better than providing a ton of data loader screenshots, I will make the demonstration using a an Apex anonymous code that will send two records in the bulk.

anonymous Apex:

upserting 2 existing Accounts.
Set AccountIds=new Set();
for(Account a : [Select ID From account Where ID IN('0018000000US5Jk','0018000000sjhVI')]) AccountIds.Add(a.ID);
SugarCRM.AccountUpsert(AccountIds);

The two records with those Ids are sent to Sugar. Here is the REST message (from the Salesforce debug logs):
04:06:38.780 (780110000)|CALLOUT_REQUEST|[57]|System.HttpRequest[Endpoint=http://mc-178-20-142-224.ovh.net/sugar/service/v2/rest.php?method=set_entries&input_type=json&response_type=json&rest_data={"session":"64c916f1b6e369543d40b0b39a3d0b18","module_name":"Accounts","name_value_lists":[[{"name":"assigned_user_id","value":"1"},{"name":"name","value":"United+Oil+%26+Gas%2C+UK"},{"name":"phone_office","value":"%2B44+191+4956300"},{"name":"salesforceid_c","value":"0018000000US5JkAAL"}],[{"name":"assigned_user_id","value":"1"},{"name":"name","value":"United+Oil%2C+Manchester"},{"name":"phone_office","value":"01020304066"},{"name":"salesforceid_c","value":"0018000000sjhVIAAY"}]]}, Method=GET]

And Sugar's answer:
04:06:39.128 (1128089000)|USER_DEBUG|[59]|DEBUG|##Body={"ids":["5d122a1a-1a6f-fa15-7f32-4ecf0626cc95","617f4722-7121-2719-523b-4ecf068caf6d"]}

The End

I hope you enjoyed this post, please feel free to share your views in the post comments.

Tuesday, November 22, 2011

[SugarCRM] SOAP and REST calls using PHP

Today I would like to share with you a recipe to connect two great CRM: Salesforce and SugarCRM. As you might know, I am self training on SugarCRM. However, it is pretty hard to find a straight forward tutorial with good samples of code. So I decided to write my own demo. This post will present two ways to create an account record in SugarCRM:
- with a web service (soap)
- with a REST call

Requirements

I am using the open source version of SugarCRM: the community edition version 6.4.0 running on my Ubuntu 10 laptop.

Versions
Apache: 2.2.21
PHP: 5.3.8
PHP Configure file:
./configure --with-apxs2=/usr/local/apache2/bin/apxs --enable-ftp --enable-bcmath --enable-calendar --with-jpeg-dir --with-png-dir --with-gd --enable-gd-native-ttf --with-freetype-dir --with-gettext --with-mysql --with-zlib-dir --with-ldap --with-openssl --enable-mbstring --enable-exif --enable-soap --enable-zip --with-curl

I am doing my tests on a local instance, the domain name is: sugarcrm1.ubuntu1, so the wdsl is reachable at: http://sugarcrm1.ubuntu1/soap.php?wsdl

Use case

I want to create this account:
- name: "Account Test 003"
- phone: "0102031003"

You need to get the MD5 hash of your SugarCRM password. Run from the command line:
php -r "echo md5('yourPassword').\"\\n\";"
ff85305ab86ceff0f59877358928d81d

SOAP

Here is a sample of code to:
- log in SugarCRM
- create an account record

$client = new SoapClient("http://sugarcrm1.ubuntu1/soap.php?wsdl", array("trace" => 1, "exception" => 0)); 

// LOGIN
$response = $client->__soapCall("login", 
  array(
    "user_auth" =>
     array(
  'user_name' => "admin",
  'password' => "0192023a7bbd73220a16f06cdf18b532",
  'version' => "0.1"
  ),
 "application_name" => ''
  )
);
$session_id = $response->id;
echo "session_id=$session_id\n";

// CREATE ACCOUNT
$response = $client->set_entry($session_id, 'Accounts', array(
 array('name' => 'name', 'value' => "Account Test 003"), 
 array('name' => 'phone', 'value' => "0102031003")
));
$account_id = $response->id;
echo "account_id=$account_id\n";

The "trace" parameter when creating the SoapClient instance let you play with the PHP Soap debug trace. Try to add these lines at the end of the code:
echo "LastRequest\n";
echo $client->__getLastRequest();
echo "LastResponse\n";
echo $client->__getLastResponse();

LastRequest:


cbbd39b6cb2774bc3db950ea095aa900
Accounts


name
Account Test 003


phone
0102031003


LastResponse:


5d0c048b-fda9-73c5-bb1b-4ecade8bd41a

0
No Error
No Error


REST

Here is a sample of code to:
- log in SugarCRM
- create an account record

// LOGIN
$url = 'http://sugarcrm1.ubuntu1/service/v2/rest.php'; 
$curl = curl_init($url); 
curl_setopt($curl, CURLOPT_POST, true); 
curl_setopt($curl, CURLOPT_HEADER, false); 
curl_setopt($curl, CURLOPT_RETURNTRANSFER, true); 
$parameters = 
  array(
 "user_auth" =>
  array(
  'user_name' => "admin",
  'password' => "0192023a7bbd73220a16f06cdf18b532",
  'version' => "0.1"
  ),
 "application_name" => ''
  );
$json = json_encode($parameters); 
$postArgs = 'method=login&input_type=json&response_type=json&rest_data=' . $json; 
echo "postArgs=$postArgs\n";
curl_setopt($curl, CURLOPT_POSTFIELDS, $postArgs); 
$response = curl_exec($curl); 
$result = json_decode($response); 
if(!is_object($result)) { die("Connection error\n"); } 
$sessionid = $result->id;
$userid=$result->name_value_list->user_id->value;

// CREATE ACCOUNT
$parameters = array(
 'session' => $sessionid,
 'module_name' => 'Accounts',
 'name_value_list' => array(
  array('name' => 'assigned_user_id', 'value' => $userid), 
  array('name' => 'name', 'value' => "Account Test 005"), 
  array('name' => 'phone', 'value' => "0102031005")
 )
);
$json = json_encode($parameters); 
$postArgs = 'method=set_entry&input_type=json&response_type=json&rest_data=' . $json; 
echo "postArgs=$postArgs\n";
curl_setopt($curl, CURLOPT_POSTFIELDS, $postArgs); 
$response = curl_exec($curl); 
$result = json_decode($response); 
print_r($result);
curl_close($curl);  

Here is the parameters sent:
method=set_entry&input_type=json&response_type=json&rest_data={"session":"3f339d60c1050ed57e44976a135e156a","module_name":"Accounts","name_value_list":[{"name":"assigned_user_id","value":"1"},{"name":"name","value":"Account Test 005"},{"name":"phone","value":"0102031005"}]}

And the result (deserialized):
stdClass Object
(
    [id] => bb7fd58d-fd85-045f-c7a2-4ecad4d4aba2
)

In the next post I will show an easy way to synchronize data between Salesforce and SugarCRM!

Monday, October 24, 2011

[Salesforce] The one minute Salesforce Workbook!

Many times during my assignments, customers and partners ask: "Olivier, we need a workbook, but it will require at least 2 days to build one manually because we have so many objects. Could you help?". So I wrote this very small piece of PHP code that automatically builds an Excel workbook. And today, I am sharing it with you! Under the License GPL v2

Requirements

First of all, you need PHPExel: http://phpexcel.codeplex.com/

Then, you need the Salesforce.com PHP Toolkit: http://wiki.developerforce.com/index.php/Web_Services_API#PHP
Download the partner wsdl from your org, go to:
Setup | App Setup | Develop | API > Partner WSDL > Generate Partner WSDL
Do not forget that the partner wsdl can be shared with any org, but the endpoint is different in sandbox and in the production.

And last, check that you have a PHP environment to execute the script from the command line.
Here is a sample of a PHP configure (the step before the make):
./configure --with-apxs2=/usr/local/apache2/bin/apxs --enable-ftp --enable-bcmath --enable-calendar --with-jpeg-dir --with-png-dir --with-gd --enable-gd-native-ttf --with-freetype-dir --with-gettext --with-mysql --with-zlib-dir --with-ldap --with-openssl --enable-mbstring --enable-exif --enable-soap --enable-zip
If your execution environment is Windows, make sure that the correct DLLs are selected in your ini file.


The file system

Create a directory that will host the code.
Unzip PHPExcel in a folder called PHPExcel.
Unzip in the folder called phptoolkit the PHP Tool kit.
Copy the wdsl to phptoolkit/soapclient
Copy/paste the PHP source to a file called workbook.php


Your directory should look like (3 first levels, dir only):
olivier@Ubuntu1:~/SFDC/blog/Tortuga-crm/Post_workbook$ tree -d -L 3
.
|-- PHPExcel
|   |-- Classes
|   |   `-- PHPExcel
|   |-- Documentation
|   |   |-- API
|   |   `-- Examples
|   `-- Tests
|       |-- images
|       `-- templates
`-- phptoolkit
    `-- soapclient

The workbook.php code :

// replace with your user & password + token
$user='username@domain.com';
$password='yourPassword';
$token='yourToken';
$objectNames = array('Account', 'Contact', 'Opportunity');
$objectFields = array('name', 'label', 'type', 'length', 'nameField', 'namePointing', 'byteLength', 'calculated', 'caseSensitive', 'createable', 'updateable', 'sortable', 'custom', 'defaultedOnCreate', 'deprecatedAndHidden', 'digits', 'filterable', 'groupable', 'idLookup', 'nillable', 'precision', 'restrictedPicklist', 'scale', 'unique');
date_default_timezone_set('Europe/Paris');

define("BASEDIR1", "./phptoolkit/soapclient");
define("BASEDIR2", "./PHPExcel/Classes/");
require_once (BASEDIR1.'/SforcePartnerClient.php');
set_include_path(BASEDIR2);
require_once('PHPExcel.php');
require_once('PHPExcel/IOFactory.php');

echo "Connecting to Salesforce... ";
$conn = new SforcePartnerClient();
$conn->createConnection(BASEDIR1.'/partner23-prod.wsdl');
$mylogin = $conn->login($user, $password.$token);
echo "connected\n";

$excel = new PHPExcel();
$excel->removeSheetByIndex(0);  // remove 1st worksheet
$spreadsheetNb=0;
$no=1;
foreach($objectNames as $objectName) {//sheets: one per object
 echo "Sheet #".$no++.": $objectName\n";
 $objWorksheet = $excel->createSheet();
 $objWorksheet->setTitle(substr($objectName,0,30)); 
 $row=1; $col=0;
 foreach($objectFields as $objectField) $objWorksheet->setCellValueByColumnAndRow($col++,$row,$objectField); //headers
 $response = $conn->describeSObject($objectName);
 $row++;
 foreach($response->fields as $field) {//fields
  $col=0;
  foreach($objectFields as $objectField)
   $objWorksheet->setCellValueByColumnAndRow($col++,$row,$field->$objectField);
  $row++;
 }
}
echo "Saving to Excel\n";
$excelWriter = PHPExcel_IOFactory::createWriter($excel, 'Excel2007');
$excelWriter->save('workbook.xlsx');

Running the script

olivier@Ubuntu1:~/SFDC/blog/Tortuga-crm/Post_workbook$ php workbook.php 
Connecting to Salesforce... connected
Sheet #1: Account
Sheet #2: Contact
Sheet #3: Opportunity
Saving to Excel

One sheet has been generated per object:

Enjoy your 1 minute workbook!

Sunday, June 5, 2011

[Security] Protect your personal data (gnu/Linux users)

1) What?

This blog presents a secure way to protect your personal data. The solution is designed to run on "Unix like" operating systems, e.g.: gnu/Linux, Mac OSX.
If you are looking for a solution to secure your professional data, please referrer to your corporate security policy.

2) Problem

You are still wondering how to keep your personal data secure. What about?
1) A USB key with plain text files
Con's
- the key is stolen, all your data are compromised.
2) A Google Spreadsheet
Con's
- if Google is hacked
- when you are off line
3) An encrypted zip file
Con's
- if your file is stolen, it might be opened using a brutal force attack
- when you are opening a text file, it is temporally copied to your system temp directory
4) A third party tool
Con's
- why will you pay for a closed source tool? This is a matter of confidence
5) An encrypted partition on your hard drive
Pro's
- yeah, smart idea
Con's
- the data can only be accessed from your laptop, and you might need your personal password when you are far from your personal computer
6) An encrypted file partition stored on an USB Key
Pro's
- Definitely YES!

3) Solution Set-up

You will find similar solutions on the Internet. This one worked pretty well on Ubuntu 10.

I recommend that you run all these steps log in as the root user.

Step 1:
Create a 256MB disk file (zero-filled) called file01. I choose to create it under my home directory:
dd if=/dev/zero of=/home/olivier/virtualfs/file01 bs=1024 count=262144 
Then you might want to change the file owner, e.g.:
chmod olivier.olivier /home/olivier/virtualfs/file01

Step 2:
Get the first free loopback devices:
losetup -f
The command losetup -a lists all the loopback devices already in use.

Step 3:
Attach the first loopback device to your disk file:
losetup /dev/loop0 /home/olivier/virtualfs/file01

Step 4:
Crypt the disk:
cryptsetup luksFormat -c aes -h sha256 /dev/loop0
You will be ask for a pass phrase. Choose it carefully. It must not be equal to another of your passwords. Remember the Play Station Network hacking. Re using several times the same password is highly insecure.

Step 5:
Mount the disk in the system:
cryptsetup luksOpen /dev/loop0 secure01

Step 6:
Format the file system, choose your flavor:
mkfs.ext3 /dev/mapper/secure01

Step 7:
Mount the file system:
mk /media/secure01
mount -t ext3 /dev/mapper/secure01 /media/secure01
chmod 777 /media/secure01

Unmount:
umount /media/secure01
cryptsetup luksClose secure01
losetup -d /dev/loop0


4) Automate the Solution

I wrote these two scripts in order to easily mount/unmount the file disk.
This is a generic script that enable to handle multiple file disks without bothering the mounting order: the first loop device is auto detect and the unmount is based on the path.
If the script is not executed by the root user, it is ran again using a sudo command (assuming the running user is in the sudoers list).

mount-secure01.sh
#!/bin/sh

if [ "`whoami`" != "root" ]; then
  sudo $0
  exit
fi 

DEVICE_FS_PATH="/home/olivier/virtualfs/file01"
# check if already mounted
if [ -n "`losetup -a | grep $DEVICE_FS_PATH`" ]; then
  echo "Device already mounted."
  exit
fi

DEVICE=`losetup -f`
losetup $DEVICE $DEVICE_FS_PATH
cryptsetup luksOpen $DEVICE secure01
mount -t ext3 /dev/mapper/secure01 /media/secure01

unmount-secure01.sh
#!/bin/sh

if [ "`whoami`" != "root" ]; then
  sudo $0
  exit
fi 

DEVICE_FS_PATH="/home/olivier/virtualfs/file01"
DEVICE=`losetup -a | grep $DEVICE_FS_PATH | awk -F":" '{print $1}'`

umount /media/secure01
cryptsetup luksClose secure01
losetup -d $DEVICE

You might want to copy the file to a usb key and keep a backup copy on your laptop. If you lost the key, the data will not be compromised. The robber will find a key with an unknown file system, Windows will probably suggest to format it in FAT-32...

Enjoy!

Monday, May 30, 2011

[Salesforce] Scheduling an Apex call from the command line

1) Problem

This post presents a way to execute an Apex method or an Apex batch from the command line, regardless your platform (gnu/Linux, Unix, Windows) using Perl and cURL.

User Cases

  • Customer IT rules compliance: all the scheduled batches should be centralized.
  • Integration: customer needs to execute an Apex batch (e.g. after a daily data load.)
  • Customer IT does not have resources with the required skills to write and maintain an application that will deal with Salesforce API.

2) Solution big picture

This is a very simple solution that might be easily integrated in a shell script. The advantages are: no sweat for customer IT and the new capability of launching heavy processes running on the Salesforce.com side.

Technical solution in a nutshell

A shell script is calling a cURL command that deals with the Salesforce.com API. cURL posts a SOAP login message to Salesforce and opens a session. Then, cURL is calling your Apex method exposed as a web service.

The user case we will walk through

Let's assume that your customer has a nightly batch that imports new leads (with an ETL e.g.). But the phone numbers format does not meet his CTI requirements; so the system cannot match the inbound calls. We need to apply a filter on the phone numbers. The process stands in a simple string replacement using a regular expression: we will suppress all the none numerical characters with the pattern [^\d]*.

3) Solution deep dive

Why Perl?

Why Perl rather than Ruby or PHP? Perl is a popular interpreted script language that is usually pre installed on any Unix/Linux systems. Perl provides powerful text processing facilities without the arbitrary data length limits, facilitating easy manipulation of text files. (see Perl on Wikipedia )

Which Perl for your system?

on Windows, the installation is straight forward and should not upset the system administrator. Choose your flavor: Strawberry or Active State.

Why cURL?

cURL is open source and stands for “Client for URLs”. It is a command line tool for transferring data with URL syntax, supporting HTTP, HTTPS, FTP, SMTP, LDAP, etc. cURL handles cookies, HTTP headers, forms, all you need to mimic an internet browser.
cURL main site,
cURL download page.
  • Unix/Linux: build cURL from the sources (compile with openssl), download a package for your distribution (or use apt-get)
  • Windows: Get a version that support the HTTPS protocole

In action

The Perl script is performing the following actions:
  • send a login SOAP call to Salesforce.com
  • parse the response and get the session id
  • send a SOAP call that will execute the Apex command

Your Salesforce.com org data model. Add to the Lead object the custom field:
  • Name: phone cti
  • API Name: phone_cti__c
  • type: text(50)
  • Read: all profiles
  • Write: only the System Administrator

Apex Batch

This batch is making a copy of the Lead phone field to the phone_cti__c field and apply a filter that removes all the none numeric characters.
This is just some dummy code written for this recipe and not a CTI best practice!
Here is the Apex code, test method is nested in the class:
/*
BatchLeadPhones Blp = new BatchLeadPhones();
ID batchprocessid = Database.executeBatch(Blp);
System.Debug('####batchprocessid='+batchprocessid);
*/
global class BatchLeadPhones implements Database.Batchable{
    public String query;
    global database.querylocator start(Database.BatchableContext BC){
        if ((query==null) || (query=='')) query='Select phone_cti__c From Lead';
        return Database.getQueryLocator(query);
    }

    global void execute(Database.BatchableContext BC, List scope){
        List Leads = new List();
        for(sObject s : scope){
                Lead l = (Lead)s;
                String ph = l.phone_cti__c.replaceAll('[^\\d]*','');
                if (ph != l.phone_cti__c) {
                    l.phone_cti__c = ph;
                    Leads.Add(l);
                }
        }
        if (Leads.Size()>0) update Leads; 
    }
    
    global void finish(Database.BatchableContext BC){
    }
    
    // test method
    static testMethod void test_BatchLeadPhones() {
        Lead l = new lead(LastName='lead test 123', phone_cti__c='+1 (555)123-4567', company='test company 456');
        insert l;
        Test.StartTest();
        BatchLeadPhones Blp = new BatchLeadPhones();
        Blp.query = 'Select phone_cti__c From lead Where ID=\''+l.Id+'\'';
        ID batchprocessid = Database.executeBatch(Blp);
        Test.StopTest(); 
    }
}
Warning, there is a bug in the SyntaxHighlighter module that forces tags to be closed. Do not pay attention to the last line.

Calling the Batch from the System Log window, run on all leads:
BatchLeadPhones Blp = new BatchLeadPhones();
ID batchprocessid = Database.executeBatch(Blp);
System.Debug('####batchprocessid='+batchprocessid);

Run on a single lead:
BatchLeadPhones Blp = new BatchLeadPhones();
Blp.query = 'Select phone, phone_cti__c From lead Where ID=\'00QA000000GCVof\'';
ID batchprocessid = Database.executeBatch(Blp);
System.Debug('####batchprocessid='+batchprocessid);
Calling the Batch from a web service:
This is the Apex class exposed as a webservice:
global class callBatches {
    WebService static String CallBatchLeadPhones() {
        BatchLeadPhones Blp = new BatchLeadPhones();
        ID batchprocessid = Database.executeBatch(Blp);
        return batchprocessid;
    }

    // Test Method
    TestMethod static void test_CallBatchLeadPhones() {
        Lead l = new lead(LastName='lead test 123', phone_cti__c='+1 (555)123-4567', company='test company 456');
        insert l;
        String ID = callBatches.CallBatchLeadPhones();
        System.assert(ID != null);
    }
}

Now you need the WSDL file.

Go to Setup | App Setup | Develop | Apex Classes. On the row of the class callBatches, click on the link “WSDL” to download the WSDL. This XML file describes how to call the web service.

As I guess you are not fluent in WSDL, I recommend that you install SOAPUI on your system. SOAPUI is available as a free edition for gnu/Linux, Windows and Mac OSX; binary and source code.
This recipe is not a SOAPUI tutorial; I will assume that you are familiar with this fantastic tool.
You might want to provide a partner WSDL to SOAPUI and get the SOAP message to open a session in Salesforce.com. Here is the body:

login.xml


user@domain.com
password+token


Replace the username, password and token by your own credentials.
Salesforce will return a SOAP message containing informations regarding the user settings and the organization. The session id appears here:
00DA0000000AXPZ!AQYAQC1_3X1zuSc47y75CU5a4omSypSox6Bg.j.hIsGDBv9hnc7b9ZAD.98ZST3jYxwqoY5TyF4VR7YDUxfWn.ZmeDnoY1Nv
Try this call using cURL. Open a shell:
curl --insecure --silent https://login.salesforce.com/services/Soap/u/21.0 -H "Content-Type: text/xml;charset=UTF-8" -H "SOAPAction: login" -d @login.xml > loginresponse.xml
The SOAP response is saved to loginresponse.xml.
Remark: the --insecure parameter tells cURL not to check the peer. By default, cURL is always checking. See this page to understand how to work with certificates:


Create a new SOAPUI project with your Apex class WSDL, fill the “?” parameters. The set of values is documented in the WSDL file.

The SOAP message should look like:


         true


            Apex_code
            Debug
         
         Debugonly


         00DA0000000AXPZ!AQYAQC1_3X1zuSc47y75CU5a4omSypSox6Bg.j.hIsGDBv9hnc7b9ZAD.98ZST3jYxwqoY5TyF4VR7YDUxfWn.ZmeDnoY1Nv


Salesforce.com will answer:


         21.0 APEX_CODE,DEBUG
23:04:07.035|EXECUTION_STARTED
23:04:07.035|CODE_UNIT_STARTED|[EXTERNAL]|01pA0000002mr28|callBatches.CallBatchLeadPhones
23:04:07.035|METHOD_ENTRY|[1]|01pA0000002mr28|callBatches.callBatches()
23:04:07.035|METHOD_EXIT|[1]|callBatches
23:04:07.042|METHOD_ENTRY|[6]|01pA0000002meNJ|BatchLeadPhones.BatchLeadPhones()
23:04:07.042|METHOD_EXIT|[6]|BatchLeadPhones
23:04:07.042|CONSTRUCTOR_ENTRY|[4]|01pA0000002meNJ|<init>()
23:04:07.042|CONSTRUCTOR_EXIT|[4]|<init>()
23:04:07.042|METHOD_ENTRY|[5]|Database.executeBatch(APEX_OBJECT)
23:04:07.085|METHOD_EXIT|[5]|Database.executeBatch(APEX_OBJECT)
23:04:07.090|CODE_UNIT_FINISHED|callBatches.CallBatchLeadPhones
23:04:07.090|EXECUTION_FINISHED


         707A000000Cj9dKIAR


4) Solution Perl Script

The Perl script is making the same actions.
  • login call (login.xml)
  • get the session id
  • insert the session id in the Apex method web service call
  • call the Apex method (request1_tpl.xml)
request1_tpl.xml is a template SOAP call. The session Id is represented by:
#ID#
Perl is replacing #ID# by the value of the session ID and saves the file to request1.xml.
Remember to update the instance name on line 16 (na1, na2, eu1, etc.)

#!/usr/bin/perl -w
use strict;

system('> loginresponse.xml');
system('curl --insecure --silent https://login.salesforce.com/services/Soap/u/21.0 -H "Content-Type: text/xml;charset=UTF-8" -H "SOAPAction: login" -d @login.xml > loginresponse.xml');
open (FILE, 'loginresponse.xml') or die ('cannot read loginresponse.xml');
my $xml=''; while() { $xml.=$_; } close FILE;
if ($xml=~m|([0-9a-z!_\.-]+)|i) {
 my $sessionid=$1;
 open (FILER, 'request1_tpl.xml') or die ('cannot read request1_tpl.xml');
 $xml=''; while() { $xml.=$_; } close FILER;
 $xml=~s/#ID#/$sessionid/;
 open (FILEW, '> request1.xml') or die ('cannot write to request1.xml');
 print FILEW $xml;
 close FILEW;
 system('curl --insecure --silent https://eu1-api.salesforce.com/services/Soap/class/callBatches -H "Content-Type: text/xml;charset=UTF-8" -H "SOAPAction: SessionHeader" -d @request1.xml > response1.xml');
}
exit;
Warning, there is a bug in the SyntaxHighlighter module that forces tags to be closed. Do not pay attention to the last line.

Remark: the command "system('> loginresponse.xml');" is not working on a Windows system. Replace it by "system('echo . 2> loginresponse.xml');"


5) Source code

source code (zip)

Monday, April 25, 2011

[Salesforce.com] Cloud Force Paris 2011


Cloud Force Paris 2011 is coming soon, featuring Marc Benioff! Join us on April the 5th. More details on Salesforce.com web site.

I will make the Heroku presentation. Heroku is an amazing Ruby on Rails multitenant cloud computing platform. I really like it, it was love at first sight :-)
Stay tune for new Heroku blog posts at this place or on the Force.com blog.

[Salesforce.com] The Code Review Tool Kit

Today I want to share a set of shell scripts that I am using when working on my code reviews.

Code review, the big picture
It consists in performing a validation of the work done by a partner, checking:
- technical design,
- code quality, respect of the best practices,
- governor limits,
- etc.

Context
Too often, I do not have an Internet access on the customer site. I am retrieving the Salesforce organization meta data using eclipse and my 3G key; then I am working off line.

What do the scripts?
On the first hand, the scripts provide a high level overview of the code structure: how many classes, pages, components, triggers, where are the classes used, etc. On the other hand two additional tools: find every usage in the org of a field and get all the relationships between the objects (lookup and master/detail).
All the scripts generate a CSV output for an easy integration in Excel, copy/paste from the shell to Excel! (I like this motto)
This is really save my time and let me focus on the review analysis.

Script sources
The code is available under the GPL license 3.0

apex.sh
Where my class is used?
Generate a CSV text output that provides an overview of each class usage.
Rows: class
Cols: pages, components, triggers

vf.sh
On which classes and components does my page rely on?
Generate a CSV text output that provides the list of classes, components and objects (standard controller) used by each page.
Rows: page
Cols: standard controller, controller, extensions

trigger.sh
Which classes are called by my trigger?
Generate a CSV text output that provides the list of classes used by each trigger.
Rows: trigger
Cols: classes

component.sh
On which classes does my component rely on? Which pages include my component?
Generate a CSV text output that provides an overview of classes used by each component, and also the pages that are using this component.
Rows: component
Cols: controller, extensions, pages

field_usage.sh
Where is my field used?
Generate a CSV text output that provides the list of meta data where the provided field is used.

objects_dep.sh
What are the relationships between my objects?
Generate a CSV text output that provides every relationship (lookup/master detail) pointing to another object.


SOLUTION DISCUSSION
The requirements
My scripts could be replaced by a program that communicates with the API and uses the DescribeObject method. But just keep in mind my two requirements:
- an off line usage
- Keep It Simple

Why a shell script?
The scripts might be optimized, or would be nicer written in a language such as Perl or Ruby rather than a shell script. I experimented several Perl XML parsers but they were slow and required Perl and Unix skills to be compiled, too complex to be shared. The choice of shell scripts appears as the best solution, with an easy deployment regardless the platform:
- Unix or gnu/Linux shell
- Mac OSX shell
- Windows using Cygwin
Awk is also required (provided with these environments).
My working place is gnu/Linux, Ubuntu flavor.

Fill the spaces!
Nature abhors a vacuum. I recommend not using blank spaces in your Eclipse project names. Always prefer an underscore. This is really making sense when it comes to shell scripts. In a shell, all space characters contained in file or directory names should be protected with a backslash:
$ cd Force.com\ IDE
Same issue in a for loop: e.g. the string “Force.com IDE” is processed as two separate files/directories:
$ for i in `echo "Force.com IDE"`; do echo $i; done
Force.com
IDE
The solution is creating symbolic links:
olivier@Ubuntu1:~/Workspaces$ ln -s Force.com\ IDE Force.com_IDE

olivier@Ubuntu1:~/Workspaces$ ls -l
total 4
drwxr-xr-x 21 olivier olivier 4096 2011-03-05 09:55 Force.com IDE
lrwxrwxrwx 1 olivier olivier 13 2011-01-26 10:43 Force.com_IDE -> Force.com IDE

Remark 1: my Eclipse workspaces path is ~/Workspaces
All my projects are located under “~/Workspaces/Force.com_IDE”

Remark 2: the provided scripts will work even if your files/directories names contains spaces because I protected the paths with double quotes.


Preparing the environment
Unzip the archive scripts.tgz and copy the scripts to your “Force.com_IDE” directory, that is where are located your projects directories. This is convenient, the scripts will be able to reach any of your eclipse projects.
To run the scripts, you have to download at least the following meta data:
- classes
- pages
- triggers
- components
- objects
Remark: all the meta data are required for the script field_usage.sh.
To add more meta data to your existing Eclipse project: open the project properties window:
click on the “Add/Remove” button:
choose your meta data:

Code naming convention
I am working with this naming convention:
Visual force pages: VF + [number] + [name].
Triggers: [object name] + [event] + [name]. The name is optional
Apex classes (trigger): AP + [number] + name
Apex classes (controller): VF + [number] + name + _Ctrl. The class name should match with the Visual force page name
Apex classes (others): name
Components: CO + [number] + [name].
Remark: the number are defined in your technical design document (assuming you have one).


Scripts “limitation”
The best approach would had been to work with a code parser, a XML parser and multi lines regular expressions. I choose a “quick & dirty” way, using simple shell commands line:
Pro's
- quicker development
- easy to understand, maintain
- very fast script execution
con's
- hell, no con's, that doing the job pretty well!


THE SCRIPTS
./apex.sh
Run the command:
apex.sh [Directory]
Result:
The script prints to the standard output a CSV text result. Each row represents a class and provides the list of the pages, components and triggers where the class is used:
When the class is used in several vf pages, the names are separated by a pipe sign.

Here is a command line sample, where Dummy_Org is the name of my Salesforce organization.
olivier@Ubuntu1:~/Workspaces/Force.com_IDE$ ./apex.sh Dummy_Org
class,page,component,trigger
AP01_OpportunityStatus,,,OpportunityAfterUpdate
AP02_AccountHierarchy,,,AccountBeforeCreateUpdate
AP03_OpportunityLost,,,OpportunityAfterUpdate
CO01_mashup_Ctrl,,CO01_mashup,
VF01_AccountNew_Ctrl,VF01_AccountNew,,
VF02_ContractWizard_Ctrl,VF02_ContractWizard,,
VF03_AccountList,VF03_AccountList,,

You might wish to copy/paste the result to Excel and get a fancy layout:

vf.sh
Run the command:
./vf.sh [Directory]
Result:
The script prints to the standard output a CSV text result. Each row represents a visual Force page and provides the list of the Object controller, Apex controller, Apex extension used by the page.

Here is a command line sample:
olivier@Ubuntu1:~/Workspaces/Force.com_IDE$ ./vf.sh Dummy_Org
page,stdcontroller,controller,extensions
VF01_AccountNew,,VF01_AccountNew_Ctrl,
VF02_ContractWizard,,VF02_ContractWizard_Ctrl,
VF03_AccountList,Account,,VF03_AccountList


trigger.sh
Run the command:
./trigger.sh [Directory]
Result:
The script prints to the standard output a CSV text result. Each row represents a trigger and provides the list of the Apex classes used by the trigger:

Here is a command line sample:
olivier@Ubuntu1:~/Workspaces/Force.com_IDE$ ./trigger.sh Dummy_Org
trigger,classes
AccountBeforeCreateUpdate,AP02_AccountHierarchy
OpportunityAfterUpdate,AP01_OpportunityStatus|AP03_OpportunityLost

In this example, the trigger OpportunityAfterUpdate is calling two classes: AP01_OpportunityStatus and AP03_OpportunityLost


components.sh
Run the command:
./components.sh [Directory]
Result:
The script prints to the standard output a CSV text result. Each row represents a component and provides the list of the Apex controller, Apex extension used by the component and the visual force pages where the component is used.

Here is a command line sample:
olivier@Ubuntu1:~/Workspaces/Force.com_IDE$ ./components.sh Dummy_Org
component,controller,extension,page
CO01_mashup,CO01_mashup_Ctrl,,


field_usage.sh
Run the command:
./field_usage.sh [Directory] [field name]
Result:
The script prints to the standard output a CSV text result. Each row represents a meta object where the search field is present.
Columns: object type, object name, number of matches.

Here is a command line sample:
olivier@Ubuntu1:~/Workspaces/Force.com_IDE$ ./field_usage.sh Dummy_Org Segmentation__c
metaObject,name,occurence
applications,Dummy_Org_App,1
classes,VF01_AccountNew_Ctrl,10
classes,VF02_ContractWizard_Ctrl,8
layouts,Account-Customer Layout,1
layouts,Account-Prospect Layout,1
objects,Account,3
objects,Site__c,7
profiles,Account Manager,11
profiles,Admin,12
profiles,ContractManager,11
profiles,MarketingProfile,11
profiles,ReadOnly,11
profiles,Standard,11
triggers,AccountBeforeCreateUpdate,1

Remark 1: as the search relies only on the name, the script will return every occurrence of the file name. E.g. if you have created one custom field “segmentation__c” on the account object and another one on the opportunity object, all the occurrences will be returned, regardless their parent object.

Remark 2: I do not remove the comments in the Apex and Visual force (this will come in a future release). So when the field name appears in a comment it is considered as a valuable match.


objects_dep.sh
Run the command:
./objects_dep.sh [Directory]
Result:
The script prints to the standard output a CSV text result. Each row represents a relationship.
Columns: object 1, type of relationship, object 2.
object 1 as a relationship pointing to object 2.
the type of relationship might be “lookup” for a lookup, and “md” for a master-detail.

Here is a command line sample:
olivier@Ubuntu1:~/Workspaces/Force.com_IDE$ ./objects_dep.sh Dummy_Org
parent,relationship,child
Account,lookup,AccountExecutive__c
Account,lookup,CountryId__c
Contact,lookup,CountryId__c
Town__c,md,CountryId__c


Conclusion
I hope you will find these scripts useful. I am using them almost every day, so I will bring improvements and will post updated versions to this blog. Feel free to give your feedback by dropping a note in the blog comments.

[Salesforce.com] Facebook Apps integration

Introduction
This post is a tutorial that explains how to write a Facebook Application connected to a Salesforce organization.
Basically this is a connection between three Clouds: Facebook, Salesforce and your application.
Audience: non technical & technical profile.

Source code
The code is written in PHP and is available under the GPL license 3.0


Requirements
To understand the example you need:
  • basic knowledge of Salesforce
  • basic knowledge of designing a dynamic web page
  • basic knowledge of HTML/CSS
  • background in a programming language (PHP, Java)
To drive through the example, you will also require:
  • A Salesforce.com organization: your own Org (Production or Sandbox), or a developer environment. Not a force.com environment, unless you replace the Contact by a Custom Object.
  • Your own server, hosting an Apache/PHP Server (my favorite flavor is Linux), must be reachable from the internet
  • A domain name (to get access to your App)
The command lines to compile Apache and PHP and the configuration files are detailed at the end of this document.


Every 20 years, the computer industry have major changes that dramatically modify the way the companies are working. In the 60's we had mainframes, in the 80's client/server architectures, in 2000 the applications moved to the clouds. This shift has now moved to platforms, companies can now build applications in the clouds.
This shift impacted as well the way we are communicating: from workgroups to intranet computing, the collaboration has moved to the clouds too: Google, Facebook, Twitter and now Salesforce Chatter.
Today the business value of driving a Facebook page that collected thousands of “likes” is low if it is not connected to your other clouds.

Why social?
Let's assume that you are a proud owner of a B2C business. Most of your customers do not report their remarks, suggestions or complains. Why? The web form on your corporate web site might be not appropriate, or maybe this is not the right channel to collect these requests. Your B2C customers would be more comfortable in a casual environment where they could feel “like home”. Social networks are the answer and Facebook is THE place.

Here is the big picture: your company has a page on Facebook. The wall is dedicated to mass communication, so your customers will not post their requests to the wall ; the reasons:
- a lack of privacy
- you do not want the issues to be posted on your wall and being world readable


How to improve the process?
In this blog post, we will see how to create a Facebook Apps that will collect your customers' queries and push them to your Salesforce Org.


Let's drive through a simple user case. The customer wants to report an issue occurred a product.
Connect to the App
Step 1:
He goes to the App tab in your company Facebook page
First time: he grants the application (this step will be detailed later)
Step 2:
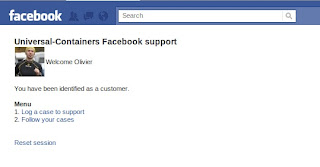
he lands in the App home page, nested in the tab. He did not loose the context. He is still in Facebook and continues receiving notifications and chat messages.
The home page is querying Salesforce to check if the Facebook user is known. We match his Facebook Id with an external field on the contact object.
Home page customization: message “Welcome user.firstname” + show the user profile thumbnail picture
- Known user: message “You have been identified as a customer”
- otherwise: no message
The menu:
1. Log a New Case
2. Browse my Cases
Log a New Case
  • a form populated with the Facebook fields: first& last names, email address. All the fields are editable (this let the user switches for his real identity if he is using a fake name in Facebook)
  • Case fields: reason & description
  • The user clicks on the submit button
Log a New Case, behind the scene
  • if the user does not match with an existing contact, we create a new contact, providing his Facebook ID
  • We create a new case attached to the Contact (lookup relationship)
  • We retrieve the Case Number
  • New page: we show the Case Number
cases list
Case detail


The implementation would have been more smart using a Personal Account but I choose the Contact object to keep it simple.


Create your Salesforce organization If you are new to Salesforce, sign up for a developer account. It is free, not time limited, and let you test all the features.
Limitation:
- limited storage
- you are not allowed to drive a commercial business on a developer edition
Salesforce online documentation: http://developer.force.com/


This step should be easy if you do not live in France! First of all, go to the url:
Facebook will check that you are a human being by asking your cell phone number. A token will be sent by SMS in a few minutes. Facebook decided one year ago to stop sending SMS to France. But you are lucky if you are living in the Democratic Republic of the Congo, you will receive the message...
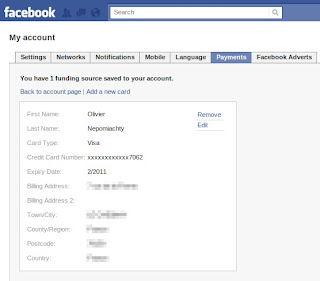
Hopefully, there is a workaround: provide your credit card number! Ha ha! If you are not confident with this part of the process I suggest you to ask to your bank a temporary card number. For 0.5 euro my bank is providing a one time usage card number with a fixed amount and a limited time life.
Then, create your App. FB will provide the tokens required when using the FB API.


Facebook will not host your App: it will be shown in an iframe. All your resources (pages, styles, pictures, etc.) will stay on your server. Your App will call FB with Soap requests using the HTTPS protocol and a client certificate. The certificate is included in the Facebook SDK.


Our architecture
The server: I set up a virtual server using OVH Cloud. They are selling virtual server on demand. The cost is 0.01 euros / hour, and you only pay for the running hours.
The bad side is that the IP & host names change at every boot (but kept if you perform a reboot).
Operating System: Ubuntu 10
Memory: 256Mo
Web server: Apache
Scripting language: PHP

Other architectures
You might as well use a Windows server with IIS and PHP as a module.
The only requirement is that your server must be reachable from the internet.

Connect to your OVH server
Log in your OVH Manager and generate a key to log in as root without a password.
Your key must not be world readable:
chmod 600 mykey.pem
Then you may log in using a shell or a putty:
ssh -i mykey.pem root@mc-111-222-333-444.ovh.net
Apache 2.2.17
./configure --enable-module=rewrite --enable-so
make
make install

PHP 5.3.3
You do not need all these libs. This is my default set but you may reduce it at your convenience. The mandatory lines are in red.
./configure \
--with-apxs2=/usr/local/apache2/bin/apxs \
--enable-ftp \
--enable-bcmath \
--enable-calendar \
--with-jpeg-dir \
--with-png-dir \
--with-gd \
--enable-gd-native-ttf \
--with-freetype-dir \
--with-gettext \
--with-mysql \
--with-zlib-dir \
--with-openssl \
--with-curl \
--enable-exif --enable-soap
make
make install

Back to Apache
Edit the httpd.conf:
Add:
AddType application/x-httpd-php .php .php3

Declare a directory:
<directory>
Options Indexes FollowSymLinks
AllowOverride None
Order allow,deny
Allow from all
</directory>


Add a virtual host:
<virtualhost>
ServerAdmin webmaster@yourdomain-name.com
DocumentRoot /home/olivier/www/site1
ServerName yourdomain-name.com
DirectoryIndex index.php index.html index.htm
ErrorLog logs/yourdomain-name-error_log
CustomLog logs/yourdomain-name-access_log combined
</virtualhost>


Start/Stop Apache
/usr/local/apache2/bin/apachectl start
/usr/local/apache2/bin/apachectl stop


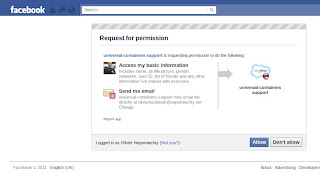
Understanding the “Request for permission” process
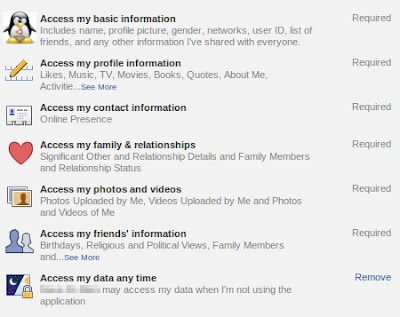
At the first time the user is getting access to the application he is asked for grants. The set of privileges is pretty wide, and with no granularity for the smallest set: Name, Profile picture, gender, user ID, list of friends, and all your public information (depending your privacy settings). This set may be enhanced. The largest one includes things like “giving access to your friends data”. A large set makes sense when used by a Facebook rich client (e.g. a BlackBerry FB client). But when it came to be used by FB games, you can easily guess that your precious data will fall directly into a commercial marketing database... And if you grant for “giving access to your data at any time” the application owner will be able to update his database at will, even when you are not using his app!
This is why you should be reasonable when asking for grant. Too many grants why make your customers fly away (unless if your target is teenagers; they will always grant for a “cool” app)
Permissions list doc: http://developers.facebook.com/docs/authentication/permissions/
User permission:
user_about_me, user_activities, user_birthday, user_education_history, user_events, user_groups, user_hometown, user_interests, user_likes, user_location, user_notes, user_online_presence, user_photo_video_tags, user_photos, user_relationships, user_relationship_details, user_religion_politics, user_status, user_videos, user_website, user_work_history, email, read_friendlists, read_insights, read_mailbox, read_requests, read_stream, xmpp_login, ads_management, user_checkins, user_address, user_mobile_phone
Friends permission:
friends_about_me, friends_activities, friends_birthday, friends_education_history, friends_events, friends_groups, friends_hometown, friends_interests, friends_likes, friends_location, friends_notes, friends_online_presence, friends_photo_video_tags, friends_photos, friends_relationships, friends_relationship_details, friends_religion_politics, friends_status, friends_videos, friends_website, friends_work_history, manage_friendlists, friends_checkins

Facebook Developer documentation
The official documentation is very weak and scattered, the examples are poor. Check this url:
http://developers.facebook.com/docs/
The most important part is understanding the graph API. This is the way to retrieve the user information. When the user is connecting to your app you get an Oauth token that will be used when calling the Facebook API. All the calls are REST and might be handled with a simple cUrl command line.
The graph API is explained on this page:
http://developers.facebook.com/docs/reference/api
The token is automatically handled by the SDKs. Choose your flavour on http://developers.facebook.com/docs/
For PHP: https://github.com/facebook/php-sdk/

Graph API usage:
Let's work with my own Facebook user Id.
Get a Facebook user Name: https://graph.facebook.com/1697007432
This is a REST call. FB returns a JSON structure:
{
"id": "1697007432",
"name": "Olivier Nepomiachty",
"first_name": "Olivier",
"last_name": "Nepomiachty",
"gender": "male",
"locale": "en_GB"
}


Get a Facebook user profile picture: http://graph.facebook.com/1697007432/picture


Now let's have a look to the code
Facebook directory: the PHP Facebook SDK
Salesforce directory: the PHP Salesforce SDK

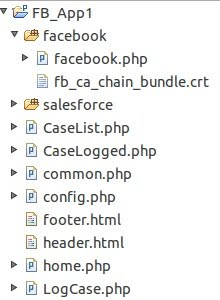
All PHP pages include common.php and config.php

config.php contains the credentials for:
- being recognized by Facebook
- access to the Facebook API
- access to your org through the Salesforce.com API
<?php
// Facebook
define("FACEBOOK_APP_ID", '123456789012345');
define("FACEBOOK_API_KEY", '112233445566778899aabbccddeeff00');
define("FACEBOOK_SECRET_KEY", 'aabbccddeeff00112233445566778899');
define("FACEBOOK_CANVAS_URL", 'http://apps.facebook.com/ucontainers-support/');
define("DOMAIN", 'mc-111-222-333-444.ovh.net');
include_once './facebook/facebook.php';
// Salesforce
define("USERNAME", "onepomiachty@myorg.com");
define("PASSWORD", "H@ck3r^");
define("SECURITY_TOKEN", "aBcDeFgHiJkLmNoPqRsTuVwXy");
require_once ('./salesforce/SforcePartnerClient.php');
?>


common.php is making the connections to Facebook and Salesforce.

Facebook
Facebook: if first connection to the app
- ask for the permissions
The permissions list is set in the parameter 'req_perms' (permissions name comma separated)
$url = $facebook->getLoginUrl(array(
'canvas' => 1,
'fbconnect' => 0,
'req_perms' => 'email',
));

Then redirect to the application landing page.

Facebook: if no session
- retrieve the user informations required and saved them into sessions variable
$_SESSION['uid'] = $facebook->getUser();
$_SESSION['me'] = $facebook->api('/me');

Access to the user first name:
$_SESSION['me']['first_name']

Facebook: if a session exists
do nothing

Salesforce
Salesforce: if no session
We are using the partner wsdl.
Connect to the org:
$_SESSION['Sforce'] = new SforcePartnerClient();
$mySforceConnection=&$_SESSION['Sforce'];
$mySforceConnection->createConnection("./salesforce/partner.wsdl.xml");
$mySforceConnection->login(USERNAME, PASSWORD.SECURITY_TOKEN);

Check if a matching contact is existing. Save the Salesforce ContactId into the PHP session:
$query = "SELECT Id, Facebookuid__c from Contact Where Facebookuid__c='".$_SESSION['me']['id']."'";
$response = $mySforceConnection->query($query);
if (count($response->records)==1) {
$record = $response->records[0];
$_SESSION['SforceContactId']=$record->Id;
} else $_SESSION['SforceContactId']='';


Salesforce: if a session exists
connect to the org (I did not find out how to keep the connection to Salesforce in the PHP session)


Now our App
The coding is similar to any PHP web site. No surprise.

Log a Case
An HTML form let your user log a Case. The form is populated with the information we already have: first name, last name, email, and the Salesforce contactId if available.
I assume that you are familiar to this kind of code and will not detailled the process. Just be aware that I had a tricky token in the Salesforce style! This token prevent the web page from being directly called. When posting the form, you have to send the token.
$_SESSION['token']=sha1(time()+$_SESSION['me']['id']);
After the user submitted the form, we create the Contact if he does not exist, and then the case. We retrieve the Case Number with a soql query and show the number to the user.
Here is the code that creates the Case:
// create the case
$fields = array (
'ContactId' => $_SESSION['SforceContactId'],
'Description' => $CaDescription,
'Reason' => $CaReason,
'Origin' => 'Facebook',
'Subject' => '[FB] '.$CaReason
);
$sObject = new SObject();
$sObject->fields = $fields;
$sObject->type = 'Case';
$createResponse = $mySforceConnection->create(array($sObject));
$caseId='';
foreach ($createResponse as $createResult) { $caseId=$createResult; break; } $caseNumber='';
// select the new Case to get the Case Number
$query = "SELECT CaseNumber from Case Where Id='$caseId'";
$response = $mySforceConnection->query($query);
if (count($response->records)==1) {
$record = $response->records[0];
$caseNumber=$record->fields->CaseNumber;
}
$_SESSION['token']='';
Header("Location: CaseLogged.php?CaNumber=$caseNumber");
exit;


See my Cases
This page provides the list of the user cases.

Header and footer
Every page includes an header and a footer. The header contains the CSS style that will make your users feel like if they were in Facebook and not a third party application.

Remark
This app is really simple, the goal was to keep the code easily readable and ajustable to meet your requirements.

Conclusion
This tutorial was a proof of concept to show that making the clouds communicate together was easy. Now it is time for you to make your own baby steps in the clouds. Feel free to re use the code and let your imagination be the only limit.